Why your washing machine drawer turns black – and the 30‑second rinse habit that keeps it pristine, say appliance technicians
You yank open the washing machine drawer and it hits you: a thick black line around the edges, specks of mould in the corners, a smell that isn’t quite “fresh linen”. You wipe it with a cloth, it smears, and you close it again hoping the next 60‑degree wash will somehow sort it. It won’t. Here’s what that black gunk really is, why it keeps coming back, and the tiny after‑wash habit technicians wish every household had.
You’re loading another mixed wash, tipping in liquid detergent and softener on autopilot, when you notice the water isn’t draining from the drawer as quickly as it used to. It pools, leaves a grimy tide mark and a faint slime under your fingers. Shut the drawer, spin at 1,400rpm, job done, right? The machine looks after itself. Except it doesn’t, and that drawer is quietly becoming the damp, warm cave mould dreams of.
What the black stuff actually is
In most cases, the black staining around your detergent drawer is a mix of mould, mildew and compacted detergent residue. The drawer cavity is the perfect micro‑climate: dark, warm, frequently damp and fed a steady diet of surfactants and fabric softener. That “soapy” build‑up you see on day one becomes a sticky film that spores can cling to by week three.
Technicians see the same pattern across brands and models. Liquid detergents and conditioners cling more than powders, cold and quick washes don’t flush the housing properly, and steam from hot cycles condenses in the drawer afterwards. If the drawer never quite dries out, microscopic mould colonies move in, then spread into the dispenser channels that feed water into your drum.
The issue isn’t just cosmetic. That gunk can slow or block the water jets that rinse detergent into the machine, meaning your carefully measured liquid never makes it to the clothes in the way it should. Left alone long enough, it can also contribute to musty smells in the drum and on fabrics, especially on low‑temperature washes.
Why modern habits make it worse
We’ve been told, rightly, to save energy by washing at 30°C and favouring quick cycles. We also love convenient liquids and scent boosters that promise “irresistible freshness”. Together, those habits change how your machine behaves inside. Cooler, shorter cycles don’t dissolve and flush residue as effectively as the old 60° cottons cycle did for your parents’ washer.
Fabric conditioner is another quiet culprit. It’s thick, oily by design, and tends to cling to plastic. When it dribbles down the side of the drawer instead of rinsing clean, it leaves behind a waxy film. Add limescale in hard‑water areas and you get a rough, grippy surface that traps even more dirt and spores. The drawer rails and roof, which most people never see, become black first.
Then there’s ventilation. Lots of us push machines into tight cupboards, close the door after a wash and only reopen it when the next load goes in. The drawer and door stay shut, humidity has nowhere to go, and condensation sits on every surface. Mould doesn’t need standing water; a constant thin film is more than enough.
The 30‑second rinse habit technicians swear by
Ask an appliance engineer what would halve their mould‑drawer call‑outs and they don’t talk about fancy cleaners. They talk about 30 seconds, a tap, and a tiny change at the end of every wash.
As soon as the cycle finishes and you’ve emptied the drum, pull the drawer fully out to its stop. Run warm (not scalding) tap water straight into each compartment for a few seconds, letting it overflow and flush the channels. Use your fingers or an old soft toothbrush to disturb any slime along the edges. Then shake off the excess and slide the drawer back in only halfway so air can circulate.
Done consistently, that 30‑second rinse does three things: it removes fresh residue before it hardens, starves mould of the sticky film it loves, and lets the cavity dry between washes. Technicians compare it to brushing your teeth; skip it for a week and the plaque settles in. The drawer still needs a deeper clean now and then, but the days of black crust in the corners largely disappear.
“If people just rinsed and cracked the drawer open after each wash, we’d see far fewer ‘my machine smells’ jobs,” one UK engineer told me. “The mould only wins when the drawer stays wet and dirty for weeks.”
- Rinse the drawer compartments with warm tap water after each wash.
- Agitate corners lightly with a finger or soft brush as you rinse.
- Leave the drawer slightly open so the cavity can air‑dry.
- Do the same with the main door: ajar, not sealed shut.
- Build it into the same moment you empty the machine.
The quick deep‑clean that resets a grim drawer
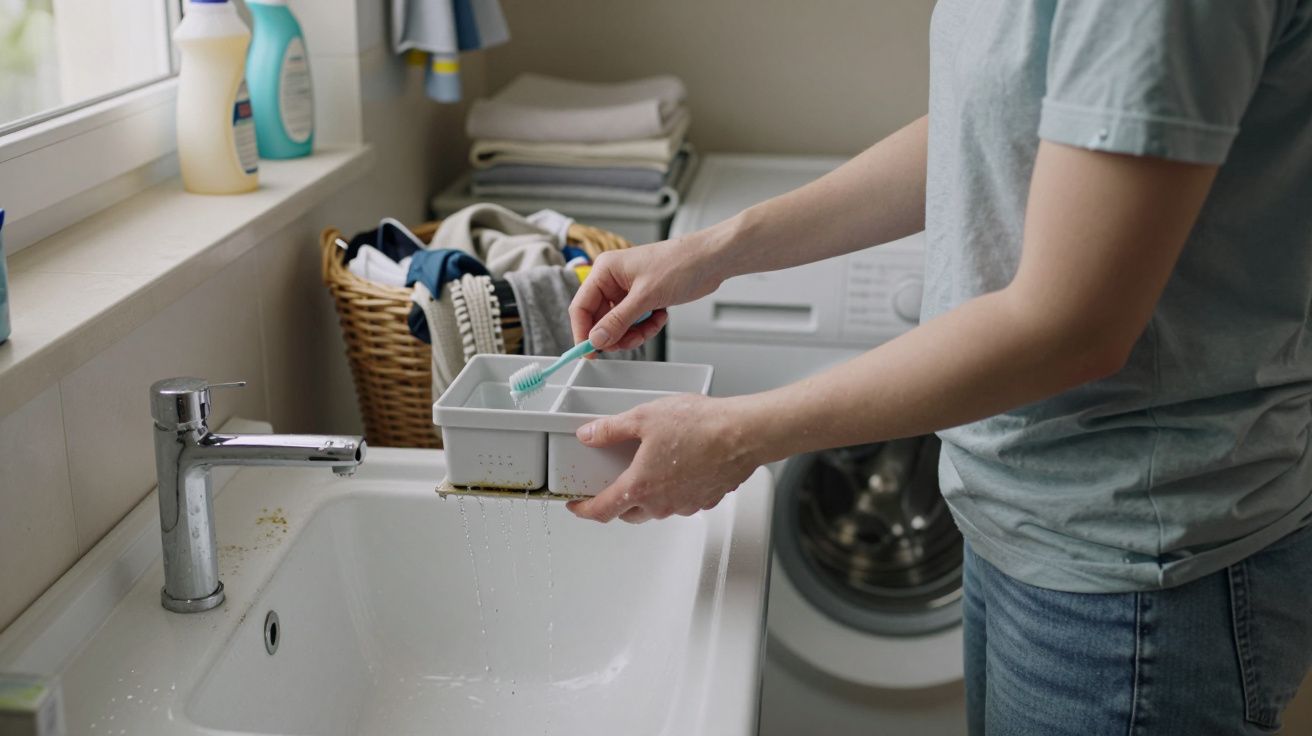
If your drawer is already black, the 30‑second habit starts after a one‑off reset. You don’t need a toolbox or a full afternoon; most modern drawers pop out with a firm tug and a press on a small plastic tab in the softener section.
Take the drawer to the sink and soak it for 10–15 minutes in warm water with a splash of washing‑up liquid and, if you like, a cup of white vinegar. Use an old toothbrush or washing‑up brush to scrub each compartment, paying attention to seams and underneath the plastic ridges. Rinse until the water runs clear and no slimy patches remain to the touch.
The bit everyone forgets is the cavity inside the machine. With the drawer out, you’ll be able to see the roof, sides and back of the housing. Spray a cloth or sponge with a mild detergent or diluted vinegar solution and wipe everything you can reach. Avoid soaking electrical parts; you’re cleaning, not hosing. When it’s dry, slide the clean drawer back, then run an empty hot maintenance cycle (60–90°C) with either a machine cleaner or a cup of soda crystals in the drum.
Simple drawer‑care routine at a glance
| Step | Action | Frequency |
|---|---|---|
| End‑of‑wash rinse | Flush drawer with warm water, leave ajar | After every wash |
| Wipe cavity | Clean inside housing with damp cloth | Monthly |
| Hot maintenance cycle | 60–90°C, no laundry, cleaner or soda crystals | Every 4–6 weeks |
Other small tweaks that keep the grime away
Drawer care works best alongside a few other small changes. None of them are dramatic; together, they shift the balance from “permanent damp” to “mostly dry”, which is all mould needs to lose.
Use the right amount of detergent for your water hardness and load size. Over‑dosing doesn’t make clothes cleaner; it just leaves more surfactant to stick in the drawer and pipes. If you live in a hard‑water area, consider a descaler once in a while or switch to a detergent designed for hard water, which can reduce the chalky scale that grips dirt.
Try to run a hotter, longer cycle every couple of weeks, even if most of your washing is at 30°C. Think towels or bedding at 60°C. This helps flush the internal plumbing and keeps biofilms from establishing beyond the drawer. And if your machine allows it, you can bypass the drawer entirely with detergent pods or by dosing directly into the drum for certain cycles; that gives the dispenser a break.
How to tell when you need a professional
Most black‑drawer issues are fix‑at‑home jobs. But there are points where a technician earns their fee. If water is overflowing from the drawer front during washes even after a thorough clean, you may have a blockage further down the dispenser hose or a weak inlet valve. That’s not something to poke at with a coat hanger.
Persistent sour smells that survive a clean drawer and a hot maintenance wash can signal a build‑up in the sump hose, pump filter or, on older machines, around the heating element. You can safely clean the pump filter yourself by following the manual, but anything involving dismantling panels is best left to someone insured to do it.
Timing matters too. If you’re regularly seeing suds in the door seal at the end of a rinse-only cycle, or clothes feel slimy rather than soapy, the machine may be struggling to flush what you put in. A technician can check flow rates, internal hoses and advise whether repairs are worthwhile on the age of the appliance.
| Key point | What it means | Why it matters |
|---|---|---|
| Black drawer = mould + residue | Warm, damp, soapy plastic breeds growth | Explains odours and poor rinsing |
| Daily 30‑second rinse | Quick flush and airing after each wash | Stops build‑up before it starts |
| Periodic reset clean | Drawer out, cavity wiped, hot cycle run | Restores performance and smell |
FAQ:
- Is black mould in the drawer dangerous? For most people it’s mainly a hygiene and smell issue, but mould spores can irritate asthma and allergies. Cleaning it off and preventing regrowth is the sensible move.
- Can I use bleach to clean the drawer? You can use diluted bleach on removable parts, but rinse thoroughly and never mix it with vinegar or other cleaners. Many technicians prefer washing‑up liquid and hot water, which are safer for seals and decals.
- Does using pods stop the drawer going black? Pods reduce residue in the drawer because they bypass it, but the housing can still get damp and mouldy if never rinsed or aired. The 30‑second habit still helps.
- My machine has no obvious way to remove the drawer – what now? Check the manual or the manufacturer’s website; most have a small release catch hidden under the softener insert. If it genuinely doesn’t come out, flush with a jug of warm water and use a cloth on a wooden spoon to reach inside.
- How often should I replace a mouldy drawer? If plastic is cracked, badly stained or smells even after a deep clean, a replacement drawer from the manufacturer or a parts supplier is relatively inexpensive and can give an older machine a fresh start.


Comments (0)
No comments yet. Be the first to comment!
Leave a Comment